Drone Roof Inspection Guide
Step-by-step guide to capturing roof inspection photos with a drone, built for ARIS Detect.
Why this guide exists
Switching from traditional roof photography to drone-based inspections can feel like a big step, especially if you're used to being on-site, climbing ladders, or walking the roof yourself. It's completely normal to feel hesitant at first. But the reality is: drones are transforming how roof inspections are done, making the process safer, faster, and more accurate.
This guide walks you through the entire process in simple, step-by-step instructions, with example photos at every stage. Whether you're brand new to drones or looking to improve your current process, it's designed to give you confidence and clarity, and to make sure ARIS Detect gets the best possible inputs from your imagery.
Why make the switch
Drones turn a high-risk, slow job into a safe, fast one
Using a drone for roof inspections significantly reduces the risks of working at heights, especially on steeply pitched or difficult-to-access roofs. At the same time, drones provide excellent visibility of the entire roof, including hard-to-reach areas such as valleys, penetrations, gutters, and flashing.
Off the roof, safer
Keep yourself and your team off ladders and away from heights, eliminating the largest source of inspection injuries.
Total visibility
Capture clear, professional images without setting foot on the roof. Valleys, ridges, flashings, all of it.
Faster inspections
A typical drone capture takes 8–12 minutes vs. 90–120 for a manual ladder inspection.
Lower operational cost
No edge protection or harness systems required. Fewer site hours per claim.
Higher-res evidence
Drone imagery embeds directly into your inspection reports for clear documentation and professional presentation.
Audit-ready records
Every shot timestamped and geo-referenced, full-surface evidence the insurer can cross-check months later.
Recommended kit
The DJI Mini 4
Lightweight, powerful, and ideal for roof inspections, especially for users operating under CASA (Civil Aviation Safety Authority) regulations in Australia.
249g
Under CASA's 250g threshold
4K
High-res photo & video
120m
Max altitude (CASA)
No license
Required for basic use
Why the DJI Mini 4?
Weight class advantage
At 249g, it sits just under CASA's 250g threshold. Drones under 250g classify as micro drones, fewer regulatory hoops in Australia.
No license for basic use
For recreational or standard commercial work (not ReOC), the Mini 4 doesn't require a remote pilot license. Recreational use also skips CASA registration.
Safe for urban environments
CASA gives sub-250g drones more flexibility around people and property, fly closer to homes than heavier drones (still no flying over people).
High-quality imaging
Despite the small size, captures 4K photos and video, perfect for damage detection, accessory ID, and report generation in ARIS Detect.
Obstacle avoidance
Advanced flight stability and object detection make it beginner-friendly when flying close to gutters, vents, and roof features.
Built for the workflow
Standard image files straight off the drone. No proprietary tooling, no awkward exports, ready to feed straight into ARIS Detect.
Heads up
Key CASA rules still apply
Even though the DJI Mini 4 falls under the 250g threshold, you still need to follow basic drone safety rules outlined by CASA:
The capture workflow
Seven steps from launch to landing
Before you start
Every roof is different, adapt the process to it.
These steps work as a baseline, but every property introduces variables that affect how your photos turn out. Stay aware of these and adjust your approach as needed:
Sheeting colour, Affects glare, contrast, and how detection reads each pixel.
Height from roof to drone, Closer for detail, higher for coverage. Dial it for the shot.
Time of day, Overhead sun gives flatter, more usable light than low sun.
Weather, Overcast softens shadows; wind affects stability and timing.
Sheeting condition, Worn, oxidised, or freshly painted metal all reflect differently.
Shadows, From trees, neighbouring buildings, gutters, or the drone itself.
These don't fit neatly into any one step. They apply across the whole capture. Note them at the start of every job, then adapt the steps below to suit the conditions on the day.
Pro tip · Balance the exposure
The same control works in both directions. Tap any area on your controller screen and a sun icon appears:
- Too dark?Drag the sun icon upto raise the exposure. Brings detail out of shadows, dark gutters, north-facing slopes, the drone's own shadow on the roof.
- Too bright?Drag the sun icon down to lower the exposure. Tames blown-out highlights (white sheeting in direct sun, solar panel glare, sky-blasted ridge caps) and brings the photo back to what your eye actually sees.
A small nudge to contrast in either direction can pull extra detail from whichever end of the range needs it.
Step 1 of 7
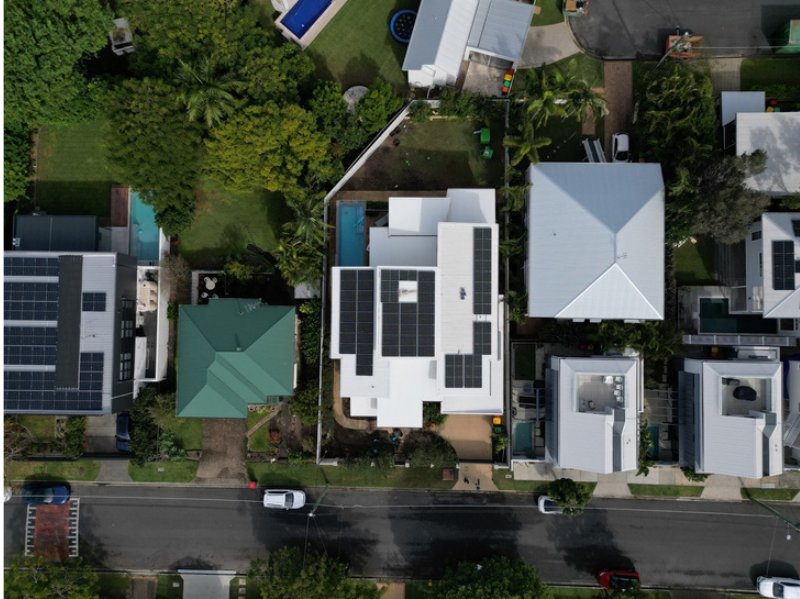
Take Full Subject Photos
Capture a clear overview of the entire roof and property.
Centre your drone on the roof and fly straight up to 50m so the full roof and surroundings are in frame.
For best results in ARIS Detect, orient the photo so the house is vertical in the frame, or for long, rectangular properties, line up the longest length of the house running vertically through the frame.
This gives the AI the cleanest, most complete view of the roof surface and feeds the report and take-off models with their preferred input.
Step 2 of 7
Pitch Finder Photo
Capture a side-on photo of a hip flashing at the midpoint, with the camera flush with the hip and roof sheeting behind.
This ensures the Pitch Findercan measure accurately. There's a precise camera position to nail, a few millimetres of drone height makes a real difference.
Square up with the gutter
Fly above the gutter and look down with the camera to make sure you're parallel with the gutter line. This keeps your side-on shot properly aligned and avoids being offset left or right.
Centre on the hip
Move the drone so it's positioned halfway along the length of the hip flashing. Being centred at the midpoint gives the clearest, most accurate angle.
Set the gimbal to 0°
Adjust your gimbal to zero degrees (level) so the camera is perfectly horizontal. This ensures the photo is taken as a true side-on view, not angled up or down.
Descend slowly
Begin slightly above the hip line and lower the drone gradually until the hip flashing appears flush with the roof sheeting behind it. Stop when the flashing lines up.
Photo examples
Aim for the middleThe hip flashing should sit flush with the roof sheeting behind it, not angled up, not angled down.
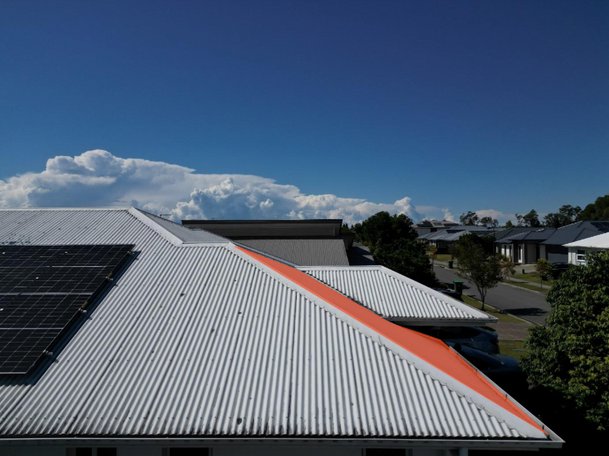
Incorrect · Too High
The hip flashing is angled downward and you can see the roof sheeting past the far side of the hip.
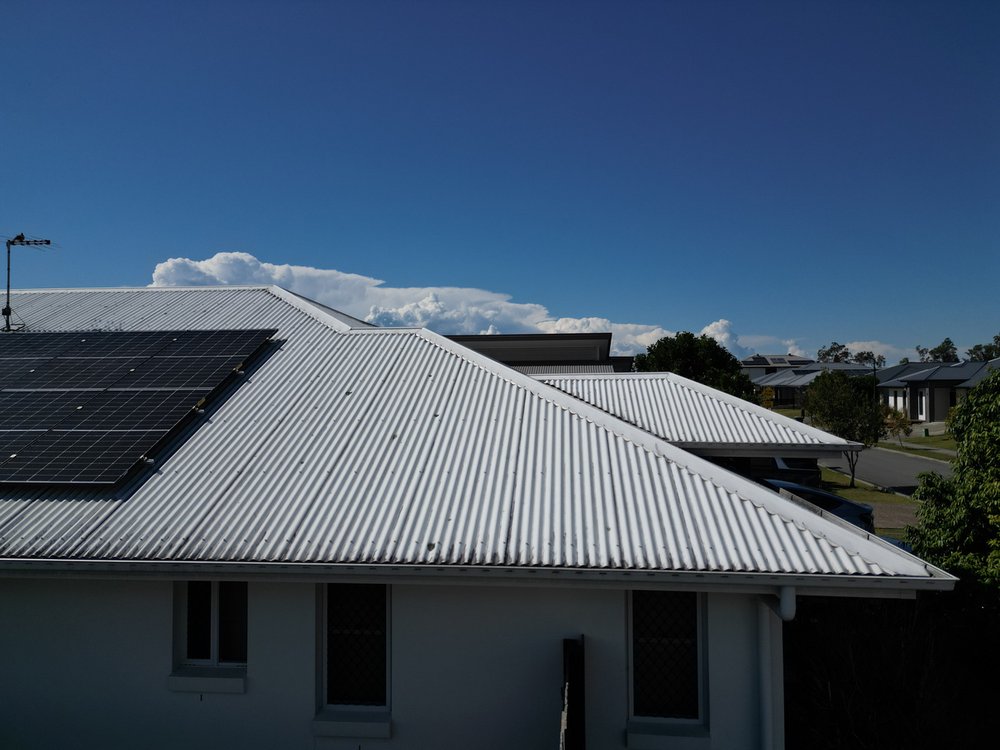
Correct · Flush with Sheeting
The hip flashing is perfectly aligned, with the sheeting directly behind appearing flush. This is the angle you should aim for.
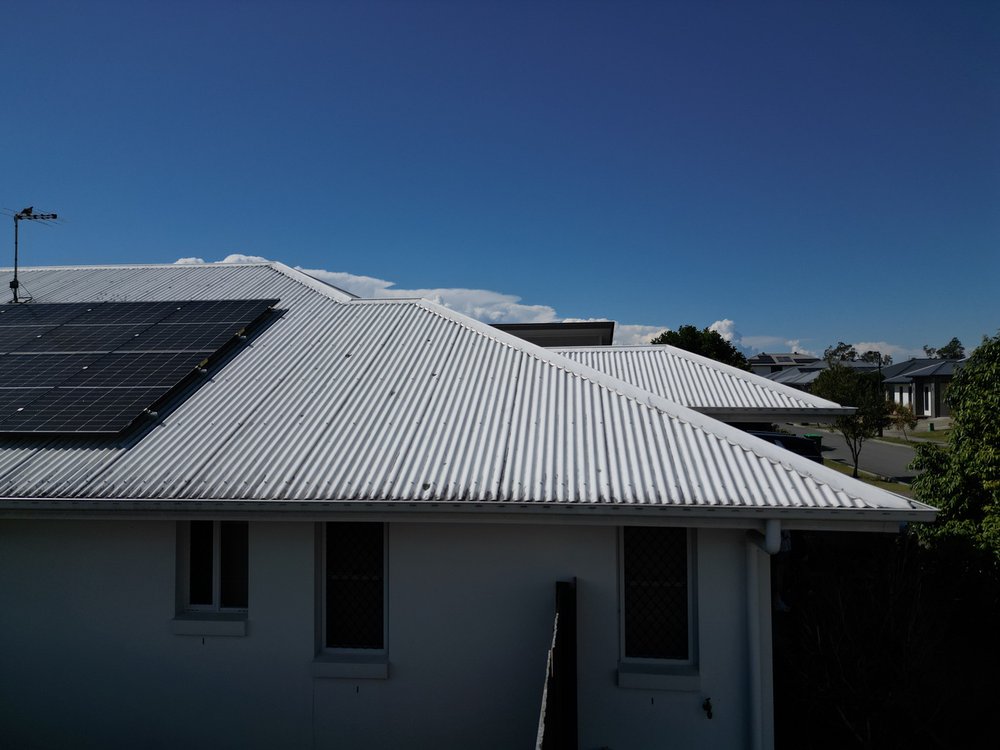
Incorrect · Too Low
The photo is angled upward, making the hip appear higher and misaligned with the roof sheeting.
Step 3 of 7
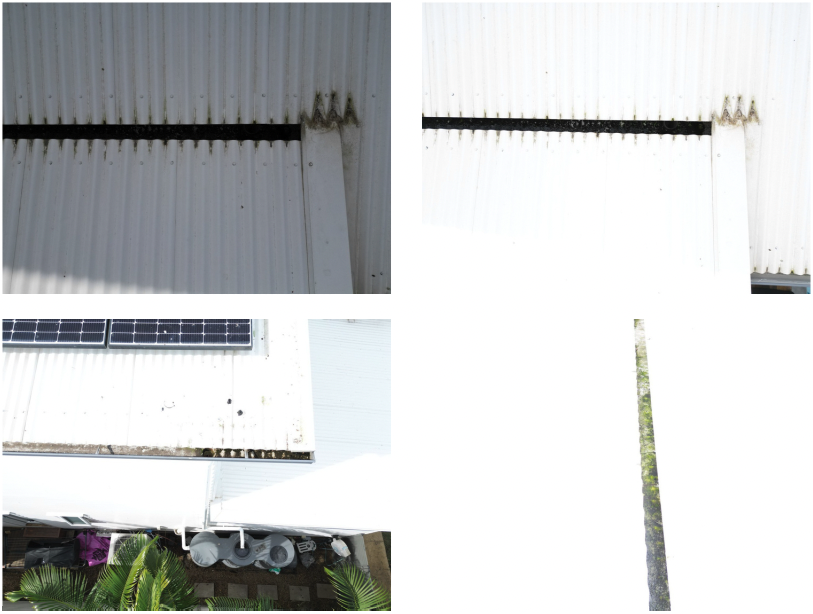
Capture Gutter & Perimeter Photos
Inspect the gutters and perimeter edges of the roof up close.
- Carefully fly the drone to around 1 metre from the roof's edge.
- You may hear the drone's obstacle sensors beeping, this is normal. It's a safety feature to help you avoid crashes. Don't go closer than the warning beeps allow.
- Position the drone so you can clearly see into the gutters.
- Continue around the entire roof, taking clear photos of all gutters and perimeter sections.
Pro tip · Dark gutters? Use the sun icon
Tap on the dark area of your controller screen to focus the camera. A sun icon will appear, drag it up to brighten and reveal details inside the gutter. The fourth photo above (bottom-right) was taken using this method, what would have been a near-black gutter is now legible.
Step 4 of 7
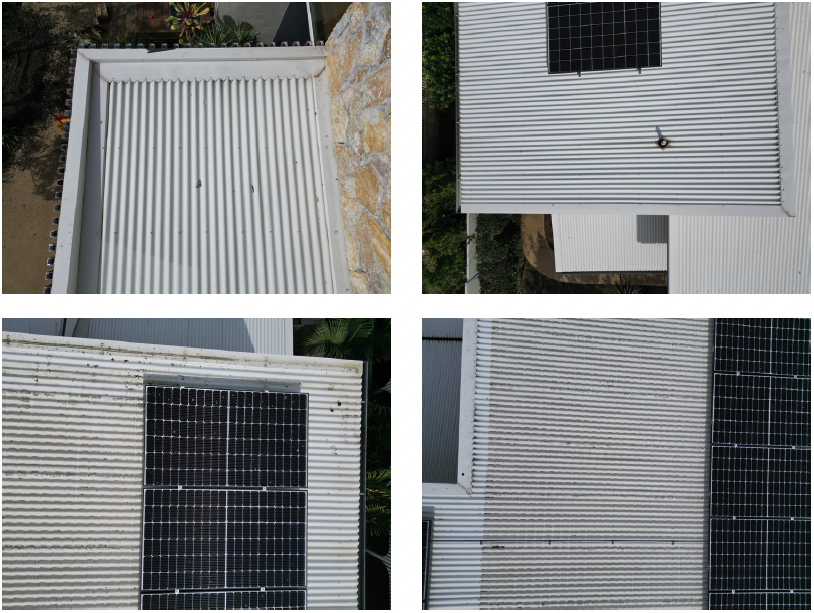
Photograph the Roof Sheets
Capture detailed images of the sheet metal roofing for AI damage detection and manual review.
- Fly the drone to 2–3 metres above the roof.
- Point the camera straight down (90°) for optimal performance with the AI model.
- Start at one corner of the roof.
- Make sure the first row of images includes the gutter line.
- After each photo, move the drone forward slightly so there's a small overlap with the previous image.
- Repeat this “lawnmower pattern” back and forth across the roof until the entire surface is photographed.
Pro tip · Use screw lines and tile rows as guides
Use the screw lines and tile/sheet rows on the roof as your overlap guide, that way you're not wasting time double-covering the same ground. Ensure the drone isn't moving while taking photos.
Step 5 of 7
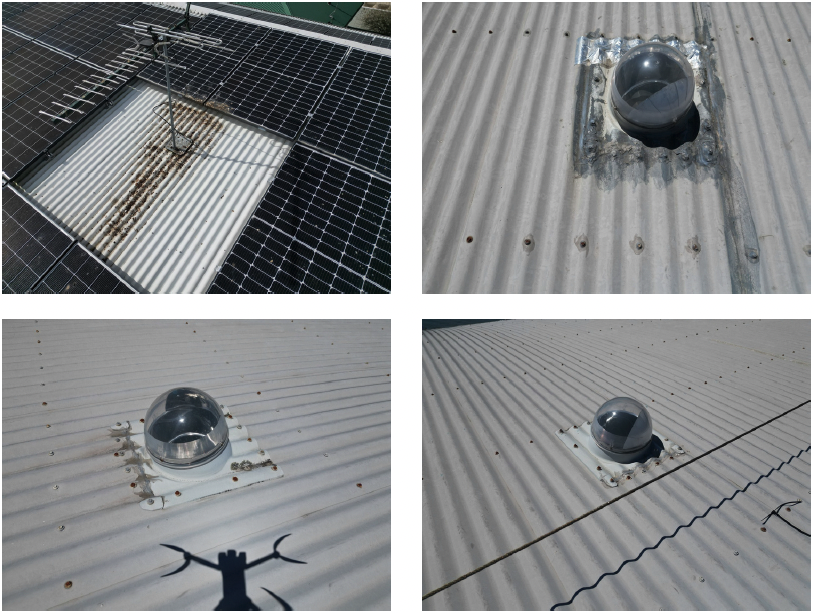
Focus on Areas of Concern
Capture detailed images of any visible or known damage.
If you noticed potential damage during Step 4, or you were informed of known issues beforehand:
- Fly back to those areas.
- Take multiple photos from different angles and heights, dents and creases that disappear from straight overhead often jump out at 30–45° off vertical.
- Capturing the same spot from various perspectives clearly shows the extent and nature of the damage in the report.
Pro tip · Adjust height and gimbal angle to the conditions
Adjust your altitude and gimbal angle to suit the conditions on the day, closer for fine detail, wider for context. If you can see the issue clearly on your controller screen, you'll see it just as clearly in the app.
Step 6 of 7
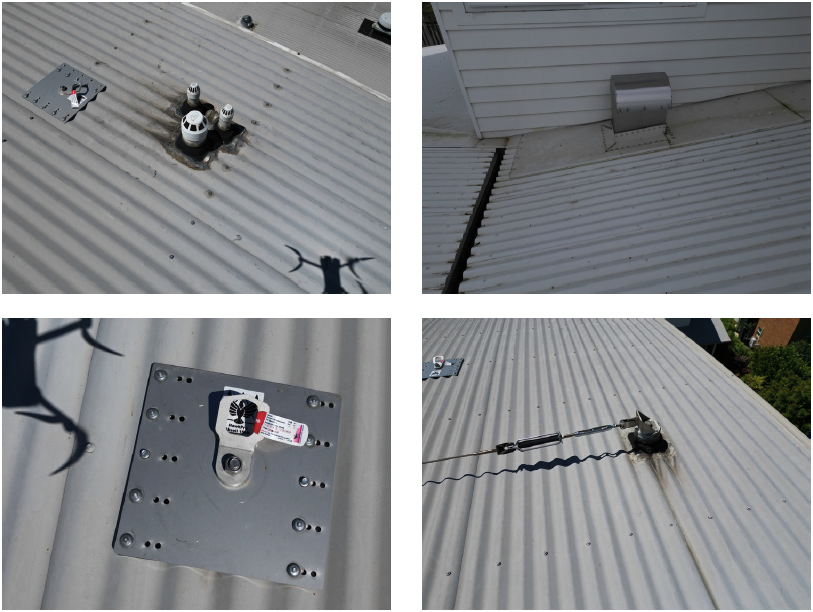
Inspect Roof Penetrations
Examine all penetrations for signs of wear or faulty seals.
Penetrations are the most common place a roof leaks, the sheeting can be in great condition while a seal around a vent has failed quietly for years. Fly around and photograph all penetrations: vents, Dektites, flues, solar panel mounts, skylights, whirlybirds, plumbing stacks and aerials.
Look for cracked or perished sealant, lifted flashing, rust around fixings and debris build-up on the upslope side. Take one shot from directly overhead and one from a low angle to the side, the side view is what shows whether sealant is genuinely sound or just looks sound from above.
Step 7 of 7
Final Check
Take any final shots before ending the inspection.
Before you bring the drone home, do a slow sweep around the roof and ask yourself:
- Is there anything I may have missed?
- Is there a better angle I could get of a key feature?
- Extra photos never hurt, they give you more options when writing your report and ensure nothing critical is overlooked.
This is your last cheap chance to fix gaps. Once the drone is on the ground, anything missing means another flight or even another site visit.
Pro tip · Review while the drone is still flying
Tap through the gallery on your controller before you initiate landing. If you spot a missing or blurry shot, you can re-take it in seconds, land first and you'll have to relaunch and re-orient just to grab one frame.
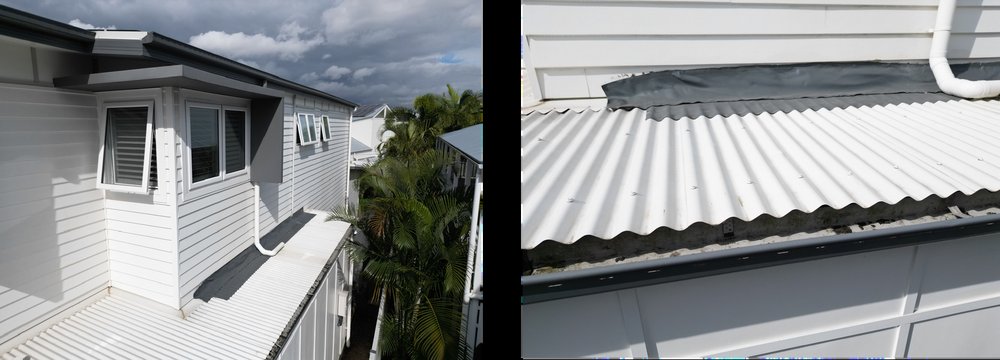
Three final tips that save reports
Review before you land
Always review your photos after landing the drone. Check that you didn't miss any sections, easier to relaunch than to come back.
Re-shoot if unsure
If you're unsure about a shot, take it again. You can delete extras later. Storage is cheap; a return trip is not.
Stay consistent
Use consistent flight patterns and naming conventions where possible, it'll save you time when organising files for the report.
Follow these steps and you'll confidently capture high-quality roof inspection photos using your drone, with better safety, consistency, and efficiency than traditional methods.
CASA, airspace, and DJI references
Ready to turn drone imagery into ARIS Detect reports?
Send us a sample batch from your next inspection, we'll show you what ARIS detects on your own roofs.
Our Articles
Introducing Roof Take Off Reports in ARIS Detect
A new semi-automated measurement tool that turns drone or satellite images into accurate, ready-to-quote roof reports in minutes.
Explore Take Off →
New article in progress
Check back shortly, more guides on inspection workflow, AI confidence scoring, and reporting cadence.
New article in progress
Check back shortly, more guides on inspection workflow, AI confidence scoring, and reporting cadence.